How to make Amiibo cards on PC for cheap and free
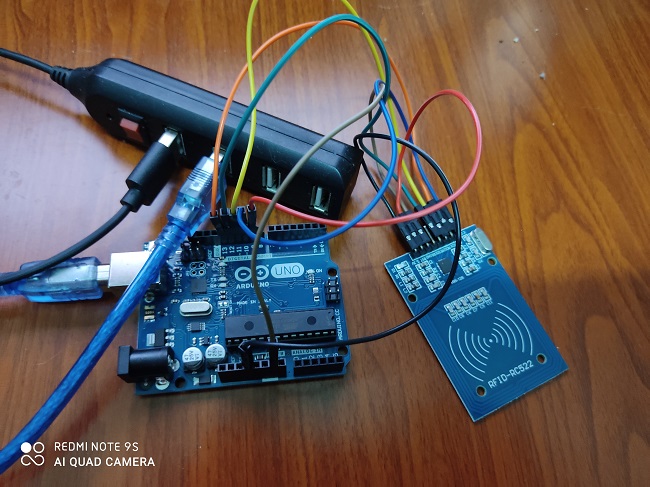
I wanted to make Amiibo cards on a budget and didn’t want to buy an Android phone, so I found a way to do it on a PC. I’ll share how I did it here.
Let me clarify first, I did say it’s free (yes, you won’t need to buy an Android phone or Amiibo cards and figurines to make your own), but you will need to spend a little bit of money on some materials needed to create Amiibo cards on a PC, I have scourge some of the cheapest material to make this .
Requirement to Start
| AMAZON | ALIEXPRESS |
| Atmegg UNO R3 with Dupont Cable $12 | UNO R3 $2 |
| RFID RC522 $9 | RFID RC522 $0.70 |
| Dupont Male to FM wires $5 for 40 | Dupont Male to FM $2 for 40 |
| NTAG 215 $6 for 30 pieces | NTAG 215 $10 for 50 Pieces |
For some reason, prices for these items on Amazon have gone up a bit, about $1-3 more. If you’re looking for a much more cheaper options than this, try buying from AliExpress or Banggood.
The list might look a bit intimidating if you’ve never worked with electronics before, but don’t worry, it’s actually pretty easy even for beginners.
Just make sure to get an RFID RC522 that’s already soldered; if not, you’ll need to solder it yourself. I bought mine pre-soldered, and the link I provided is for those.
Once you have everything, connect the Dupont wires from the Arduino to the RFID RC522 and then to the Arduino Uno R3 using the template below. It’s basically plug and play.
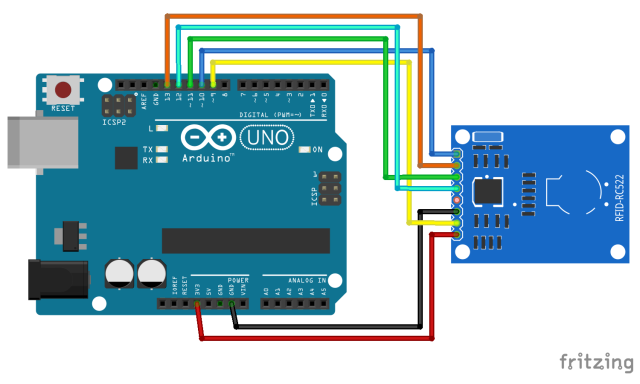
| Signal | RC522 Pin | Arduino Pin |
|---|---|---|
| RST/Reset | RST | 9 |
| SPI SS | SDA(SS) | 10 |
| SPI MOSI | MOSI | 11 / ICSP-4 |
| SPI MISO | MISO | 12 / ICSP-1 |
| SPI SCK | SCK | 13 / ICSP-3 |
| VCC | 3.3V | 3.3V |
| GND | GND | GND |
Just follow the guide for where to place each wire; the board has engravings that match the template, usually labeled A, B, C.
Once you’ve hooked up the wires, plug your board into your PC and check for blinking lights. If it blinks, that means everything is connected correctly.
Setting the Amiibomb
Now download Amiibomb. This guide below is from reddit user Seijuri2012
Once you download Amiibomb, extract it to your desktop. Inside Amiibomb folder create two folder named “Amiibo Keys” and “Amiibo .bin Dump”.
- Download a program called “HxD Editor“
- Run HxD Editor once it is installed and open a new page.
- Paste “1D 16 4B 37 5B 72 A5 57 28 B9 1D 64 B6 A3 C2 05 75 6E 66 69 78 65 64 20 69 6E 66 6F 73 00 00 0E DB 4B 9E 3F 45 27 8F 39 7E FF 9B 4F B9 93 00 00 04 49 17 DC 76 B4 96 40 D6 F8 39 39 96 0F AE D4 EF 39 2F AA B2 14 28 AA 21 FB 54 E5 45 05 47 66 7F 75 2D 28 73 A2 00 17 FE F8 5C 05 75 90 4B 6D 6C 6F 63 6B 65 64 20 73 65 63 72 65 74 00 00 10 FD C8 A0 76 94 B8 9E 4C 47 D3 7D E8 CE 5C 74 C1 04 49 17 DC 76 B4 96 40 D6 F8 39 39 96 0F AE D4 EF 39 2F AA B2 14 28 AA 21 FB 54 E5 45 05 47 66” on the page without using the quotation marks.
- Save the file and call it “amiibo_keys.bin”
- Put “amiibo_keys.bin” in the “Amiibo Keys” folder
- Open “Amiibomb.exe” It will have you pick the folder for .bin files then have you pick your amiibo keys file.
- I used the “flash” option under “file” while in “Amiibomb.”
- Pick “Internal Flasher”
- Select your Port. This is where you have your board plugged in at, Mine was “USB 3.” Select your Arduino Model. Mine was “Uno (R3)”
- Select “Flash Amiibombuino!” You know this will work because you will see your board reacting to the screen.
Flashing the Amiibos software to your NFC 215 cards
Your board is now ready to start creating amiibos, now you just need to get the bin file of any amiibo you want, I recommend downloading them from here.
- After you have all of the amiibos downloaded that you want, put the .bin files in the “Amiibo .bin Dump” folder.
- When you are ready to start making amiibos, Open “amiibomb.exe” and select the .bin file of the amiibo you want. an Image will appear in the center of the program of the amiibo that the .bin file is from.
- A menu will appear in the top right of the program. Click on “Action”
- A new menu will appear. Click on “Create NTAG”
- A new menu will pop up. Select your Port, this is the same USB port as last time.
- Select “Create Amiibo Tag!”
- Follow the on-screen instructions.
- That is it, you now have a fully functioning amiibo.
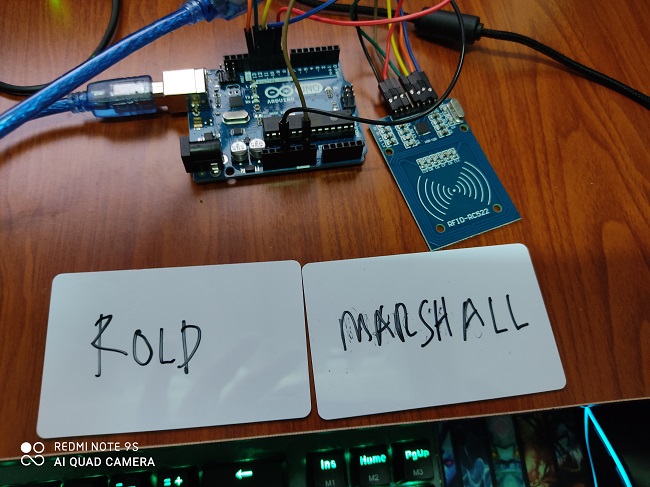
Encountering Errors
When I first trying to create my Amiibo tag, I got an error which said
amiibomb error occured: error data: error in communication.
If you run into this error, first make sure your wires are connected correctly. Then, try adjusting the placement and position of your Ntag 215 cards.
In my experience, I had issues with square Ntag cards, like the Black Jack cards, which didn’t read properly, possibly due to their placement. Moving the card sideways or slightly adjusting its position might help.
It took me two or three tries, but it eventually worked.
Usual Questions
Q: Can I buy other Ntag cards that is not 215?
A: No. Only Ntag 215 works with Amiibo
Q: My Ntag 215 cards can’t write Amiibo. What Should I do? I tried many times and still can’t write it!
A: Seller probably sent you the wrong Ntag cards . It happens a lot so try buying from reputable seller.
Q: Where can I check for Animal Crossing Amiibo list of characters?
A: This is the best site for it : https://animal-crossing.com/amiibo/
